NVISAGE Technologies
NVISAGE N1 Launch Monitor
NVISAGE N1 Launch Monitor
Couldn't load pickup availability
NVISAGE N1 Launch Monitor
A compact, overhead-mounted launch monitor at an affordable price, delivering exceptional value for golfers of all levels!
The NVISAGE N1 launch monitor transforms golfers' ball flight visualization on the driving range or golf course through third-party golf simulator software like GSPro and E6 Connect.
With specially designed balls exclusively for the NVISAGE N1, golfers can confidently analyze their game with precise accuracy. Elevate your skills at the driving range or dive into the virtual realm, experiencing real golf courses and exciting games through popular third-party software like GSPro or E6 Connect.
An overhead monitor packed with value and style
Experience indoor golf convenience and quality affordably with the NVISAGE N1. It's your way to establish a top-notch golfing environment at home without spending big. Keep your launch monitor overhead like the pros do in commercial venues—out of your swing's path—to maximize space and practice without interruptions.

Capturing your swing flawlessly
Peek behind the curtain of the NVISAGE N1's sensors. With high-speed cameras and an advanced PhysX 6D Physics Engine, this launch monitor captures your swing's secrets, making your golfing journey as precise as a hole-in-one.

N1 LAUNCH MONITOR FROM NVISAGE
SIMPLE AND PRECISE
Designed with an intuitive interface and a commitment to eliminating unnecessary complexities, the N1 Launch Monitor is game-changing overhead golf technology.
Requires Marked Balls
By virtue of its outstanding precision, achieved through the exclusive utilization of specially marked golf balls tailored for the NVISAGE N1, golfers can assess their gameplay.
Compatible with 3rd Party Software
Elevate your skills to unprecedented levels within the virtual confines of a simulated driving range or the expanse of hundreds of renowned golf courses, effortlessly achieved by seamlessly integrating the NVISAGE N1 with third-party software solutions like GSPro or E6 Connect.
Overhead Simplicity
The N1 Launch Monitor embodies simplicity and precision with its intuitive design, ensuring seamless functionality and precise results. It sets a new standard for user-friendly overhead golf technology, offering an accessible experience for golfers at all levels.
Features
Features
Instant Performance Insights
GOLF SWING ANALYTICS
Real-Time Feedback
Prepare yourself for productive practice and play with real-time feedback. The NVISAGE N1's advanced multi-camera system enhances accuracy by capturing intricate ball data from multiple perspectives, guaranteeing a comprehensive analysis of your performance.
Ultra-High-Speed Cameras
2,000FPS CAMERAS
Capture Every Swing
The N1 utilizes a dual setup of ultra-high-speed 2,000FPS cameras to meticulously capture spin rates and ball movement. The sophisticated PhysX 6D Physics Engine provides an immersive and lifelike representation of the ball's flight dynamics, delivering an exceptional pitching experience.
Data Parameters
USING MARKED BALLS
Data that Helps You Analyze Your Swing
- Club Speed
- Ball Speed
- Launch Angle
- Spin Axis
- Horizontal Launch Angle
- Back Spin
- Side Spin
- Total Spin
Spacious Hitting Area
ROOM TO SWING
24x20 Inch Hitting Area
With a spacious hitting zone measuring 24 inches deep and 20 inches wide, golfers are afforded plenty of room to tee up their ball, which improves the user experience.
Overhead Installation
UP AND OUT OF THE WAY
Overhead Mounted Launch Monitor
The NVISAGE N1 is strategically installed overhead, ensuring it remains out of range from any stray shots, swinging clubs, or accidental foot contact.
Ceiling-mounted launch monitors keep the hitting area clear.
Explore the key features:
- Overhead Golf Setup
- Flexible 3rd-Party Software Use
- Accurate Data
- Easy Setup
What's Measured
What's Measured
The pair of 2,000FPS cameras accurately track ball rotation and trajectory. The advanced PhysX 6D Physics Engine provides an immersive pitching experience. NVISAGE N1 requires marked balls with a specific dot pattern for accuracy.
Data Parameters (using marked balls)
- Club Speed
- Ball Speed
- Launch Angle
- Spin Axis
- Horizontal Launch Angle
- Back Spin
- Side Spin
- Total Spin*
*Calculated
Software Options:
NVISAGE N1 handles readings and analysis but needs golf simulator software. Compatible with:
GSPro - Experience one of the most lifelike softwares available: GSPro Golf Simulator Software. With stunning 4K graphics, lifelike ball flight and roll, and a vibrant community, it offers an unparalleled golfing experience. Practice at the driving range, tackle any shot on downloadable courses, compete in skills tests, and play matches locally or online on over 300 courses.
E6 Connect - You can use E6 with launch monitors for teaching or training on the driving range, competing in leagues and online events at a commercial facility, or simply enjoying fun games at home with friends and family.
Specifications
Specs
|
NVISAGE N1 Specifications |
|
|---|---|
| DIMENSIONS | 21.8"L x 6.9"W x 4.9"H |
| WEIGHT |
19.2 lbs |
| MOUNTING LOCATION |
Overhead |
| MOUNTING POSITION |
9-10ft overhead, 2ft in front of tee |
| HITTING ZONE |
24” x 20” |
| CAMERAS |
(2) 2,000 FPS cameras |
| COMPATIBILITY |
GSPro, E6 (more to come) |
What's Included
What's Included
- Launch Monitor Sensor
- Calibration Board
- Power Adapter and Cable
- Ethernet Cable
- Ethernet -> USB 3.0 adapter
- 6 Mounting Screws
- Level
- 12 Marked Balls
Videos
Space Requirements
HOW TO SETUP YOUR N1 GOLF SIMULATOR ROOM
N1 Mounting Location:
- 9-10 feet above the hitting surface
- 2 feet in front of the hitting surface
To mount the NVISAGE N1, position it 9-10 feet above your hitting surface and 2 feet in front of the hitting area. This setup, aligning with our recommendation to hit from at least 10 feet from your impact screen, places the NVISAGE N1 approximately 8 feet from the impact screen.

PC Requirements
Minimum requirements are determined by your course software. We recommend reviewing the recommended specs of the software you plan to use. Typical requirements are as follows:
- Intel i5 8400 (Not compatible with Apple iOS or Mac OS)
- 8 GB RAM
- GeForce GTX 1060 (AMD: 3rd gen Ryzen or higher and AMD Ryzen 3600X or higher (AMD 2700 is NOT compatible)
- Windows 10 (64 bit) Version 1803 or higher
- Ethernet Port Required
Installation
Hardware Install
Step-by-step instructions for the physical setup and installation of the N1 Launch Monitor.
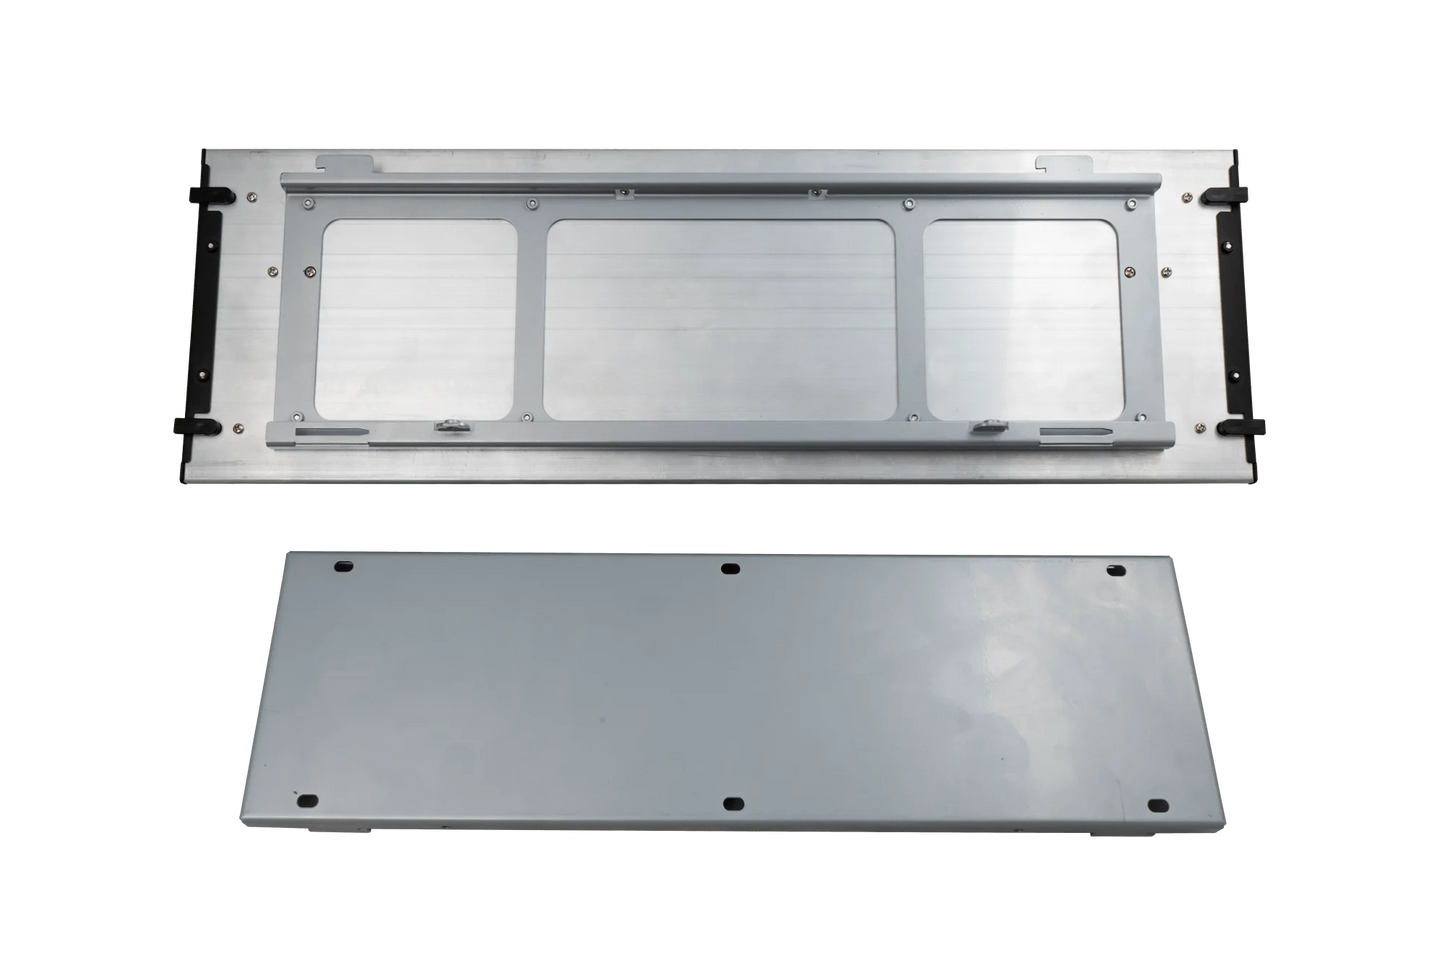
1. Your N1 unit ships with the mounting plate already attached to the launch monitor. Using a Philips screwdriver, remove the two retention screws to separate the mounting plate.
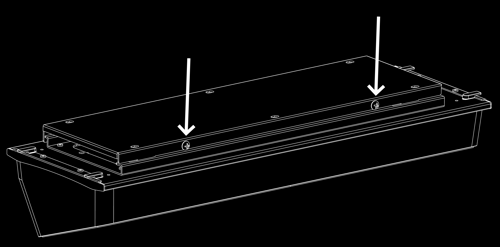
2. Using the 6 included screws, attach the mounting plate to a suitable surface. The included screws are appropriate for attaching to a solid substrate, such as plywood or structural lumber. If such a surface is not available, use the appropriate anchors for your situation (not included) to secure the mounting plate to the ceiling.
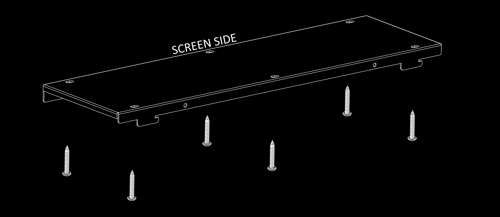
Refer to placement guidelines to ensure the unit is located correctly relative to your hitting surface.
3. Attach the N1 to the mounting bracket by inserting, rotating, and sliding.
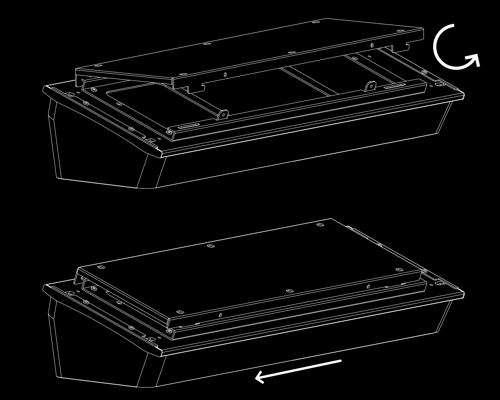
4. Secure the assembly by re-inserting the retention screws removed in step 1.
Software Install
Step-by-step instructions to download and configure the N1 Launch Monitor software.
HOW TO DOWNLOAD
- Download the current version of the Pio Software Package, found in the 'Latest Version' section above.
- Right click the Pio Software Package file and select “Run as Administrator”
- Click the “Install” button when the setup displays Microsoft Visual C++ Redistributable Package
- Click the “Next” button when the setups displays the Welcome screen
- In the subsequent setup window, choose the desired type and click the “Next” button
i. Complete: all components will be installed (recommended)

ii. Custom: you select the components to be installed (advanced)
6. Click the “Install” button to begin the installation
7. Click the “Finish” button when prompted to complete the installation
8. Restart your computer
9. Now, you’ll see a shortcut for the calibration tool titled “N1 Calibration” on your desktop!
HOW TO COMPLETE N1 CONFIGURATION
Prerequisite: the user account on your PC needs to have administrator privileges
- Plug the included USB 3.0 adapter into an open USB 3.0 port on your computer
- With the other end plugged into the N1, plug the remaining end of an Ethernet cable into the Ethernet side of the included adapted
- Turn on the N1
- Download the N1 Configuration tool for easy setup.
- Once downloaded, right click on the “n1-config.exe” file and click “Run as Administrator” with your volume on
- The N1-config.exe tool automatically handles computer settings configuration for your NVISAGE N1
- When the configuration tool is finished configuring your computer for the N1, you’ll hear “Finished configuring your computer” and see that text in the black window on the screen. Press any key to close the auto-configuration tool.
Calibration Guide
Calibration Guide
Proper calibration is important for accurate performance. Our Calibration Steps offer simple instructions to ensure that your device provides precise data on your swing, ball speed, and more.
N1 CALIBRATION PROGRAM
To open the N1 Calibration app, please double click the N1 Calibration shortcut on your desktop. Conversely, you can find the app in your hard drive by opening File Explorer and navigating to C:\Program Files\NVisage\Pio\Tools\N1Calibration.exe
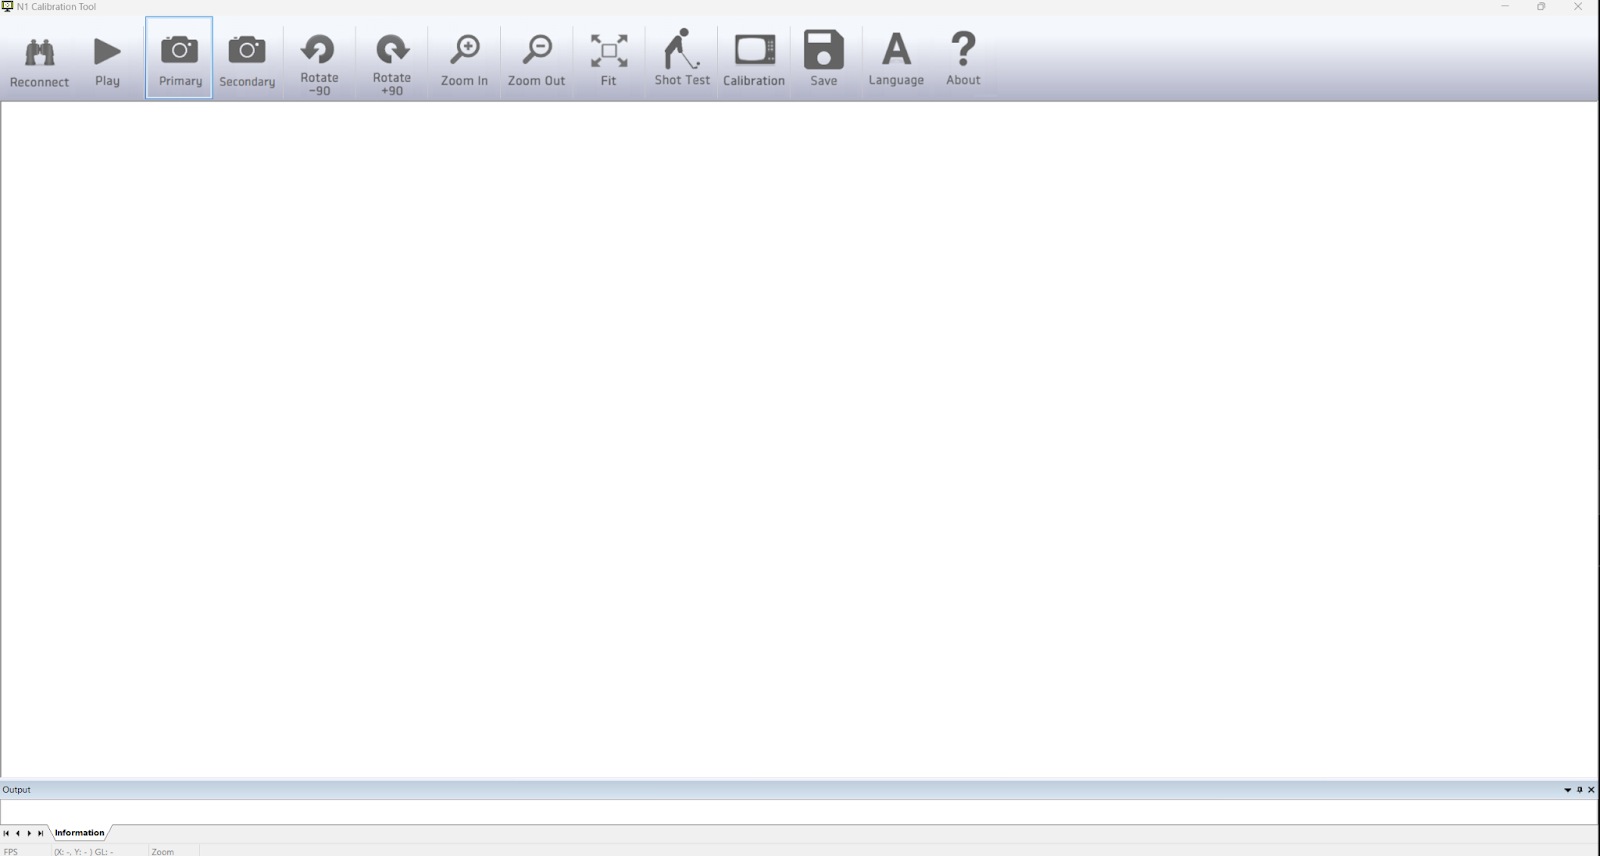
When you first open the N1 Calibration app, you should see an empty home page, looking like this:
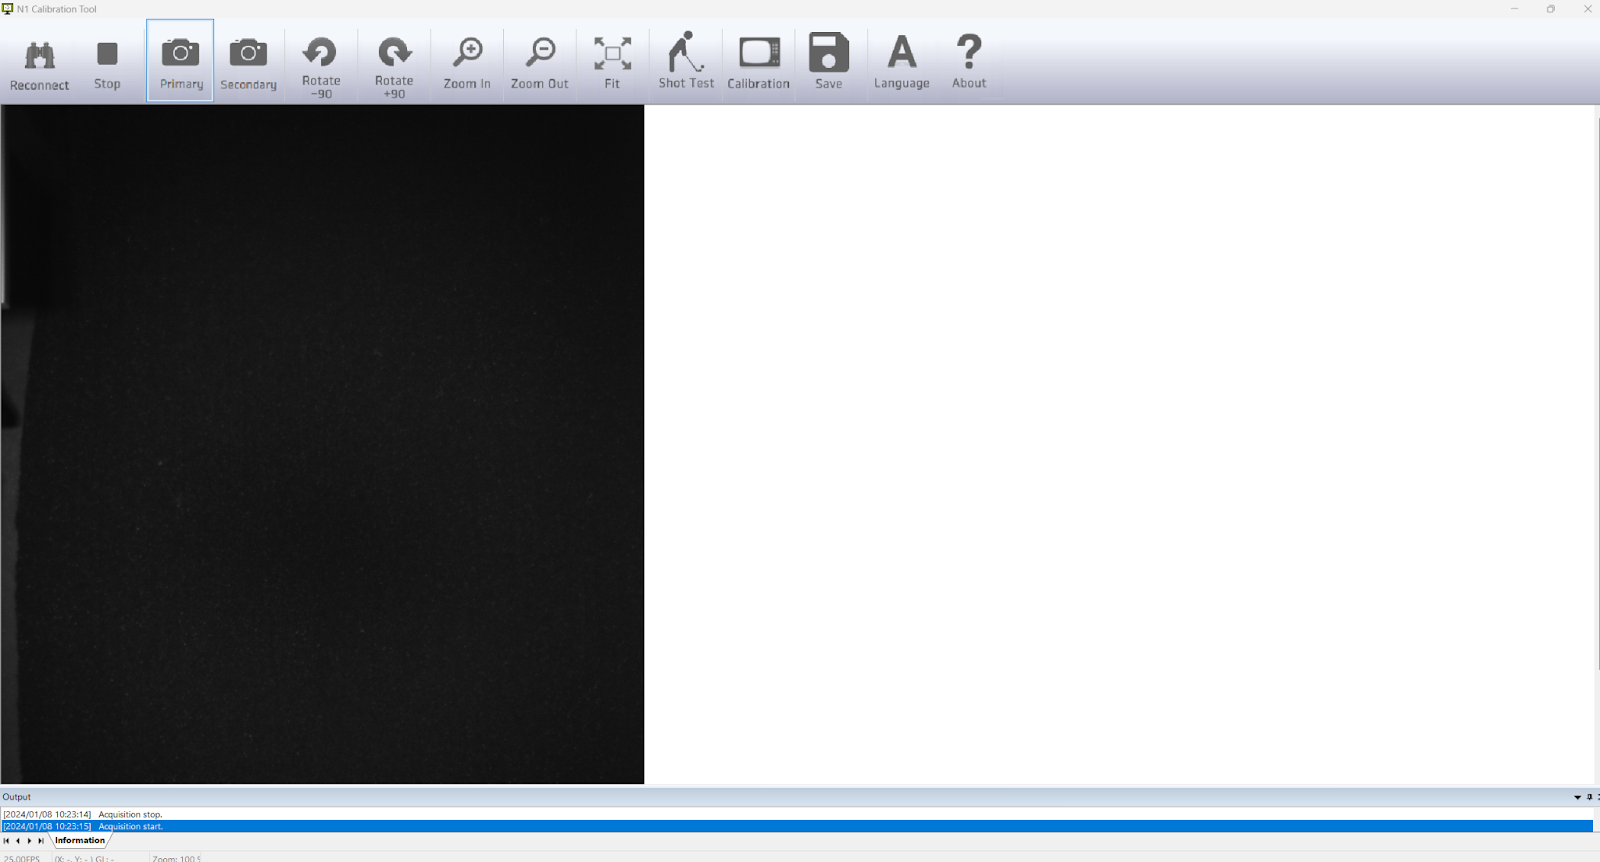
If your N1 unit is on and you successfully completed the configuration in the prior steps, pressing the Play button will immediately provide you with a video feed of your hitting area, similar to this:
If this is your first time using your N1 unit, or the N1 unit has moved locations since its last use, you’ll need to calibrate the unit for the hitting space. In order to begin configuring your unit, click on the Calibration button on the top toolbar. A popup containing instructions will appear, like this:
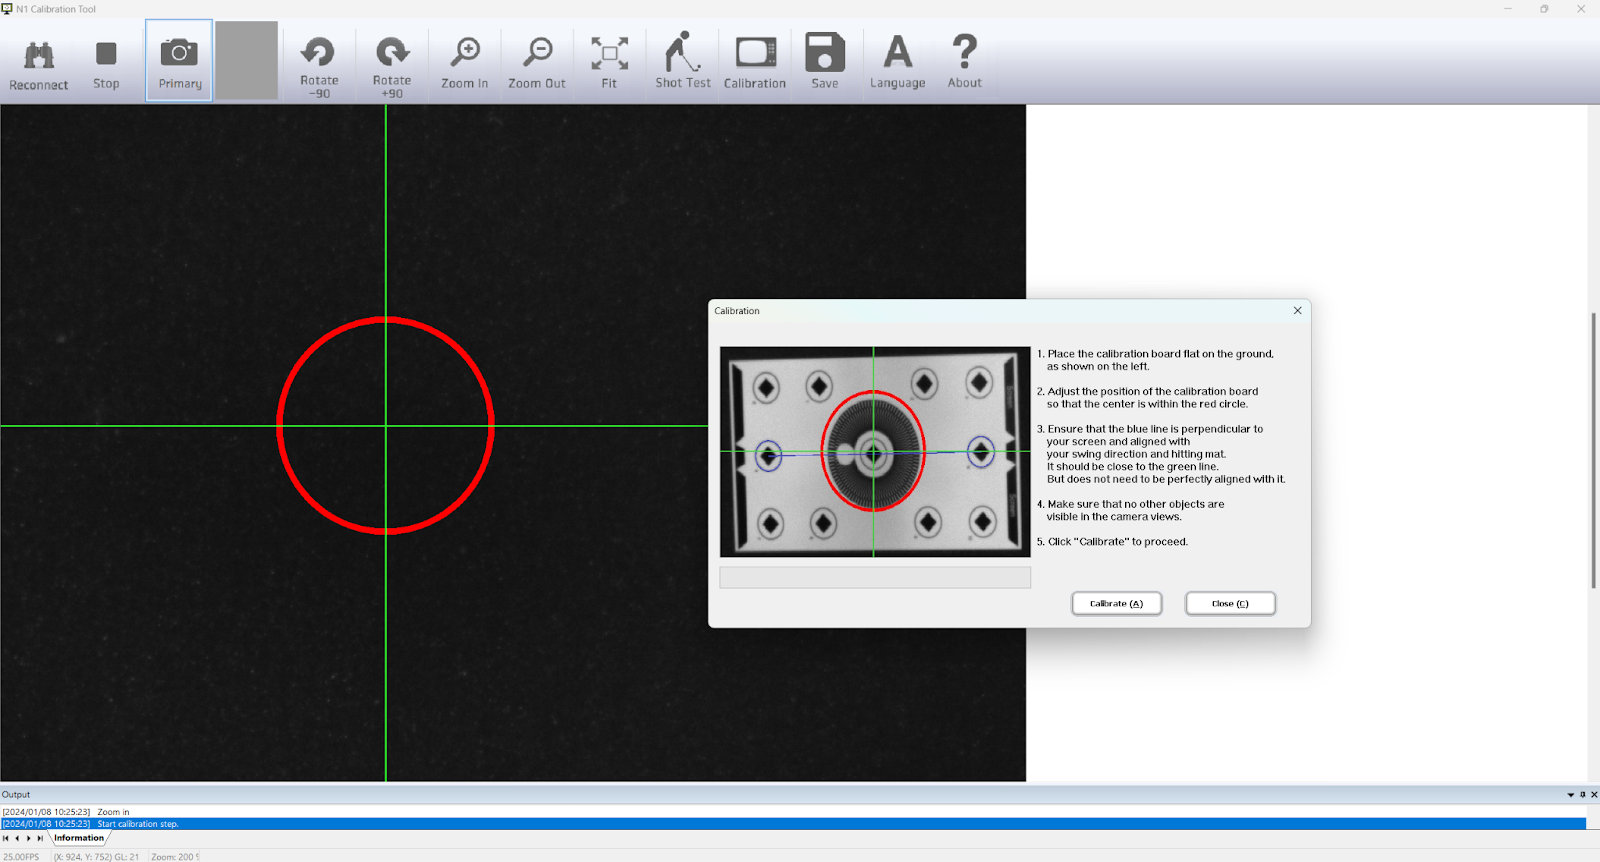
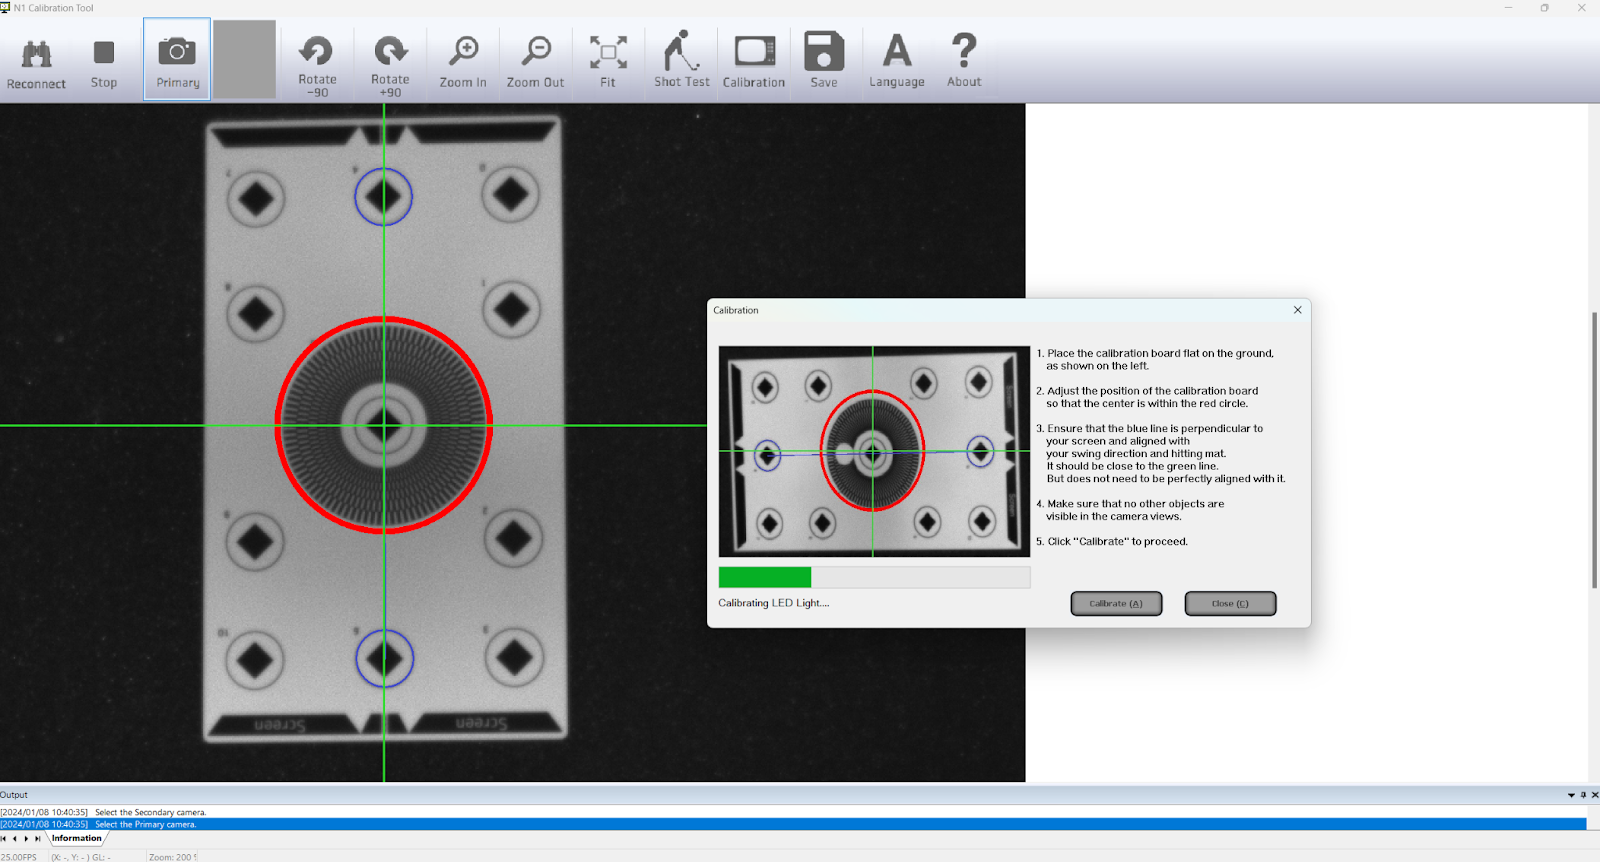
Place the included calibration board perpendicular to the N1 unit, with the end notated “Screen” facing towards the N1 unit. Using the red circle and blue orientation line, make sure that the center of the “bullseye” on the calibration board is within the red circle on your screen, and that the calibration board is straight and parallel to the blue line, as shown here:
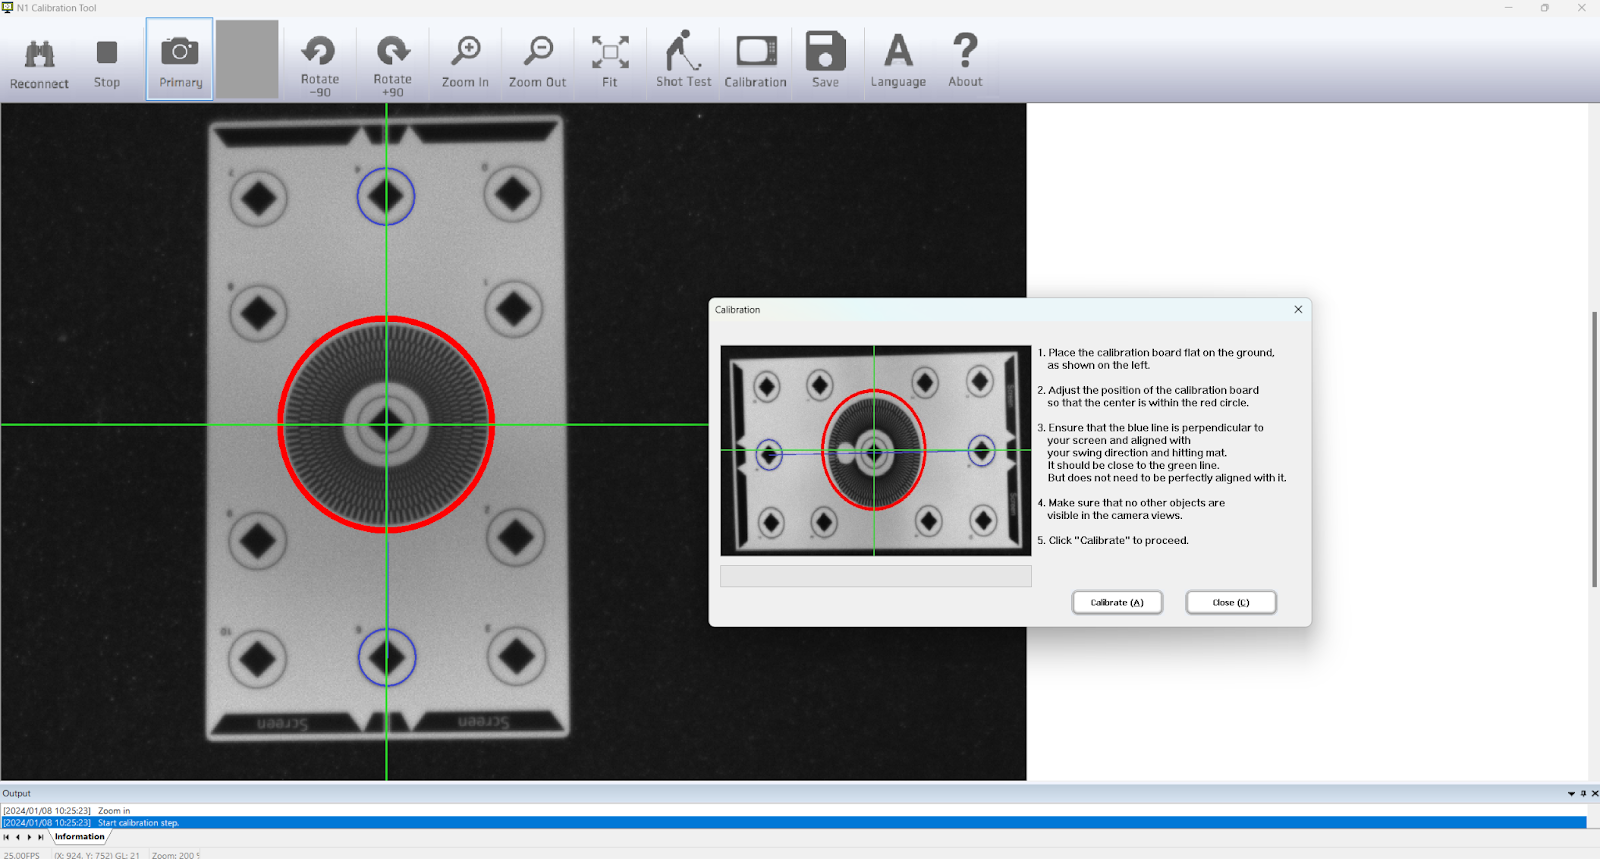
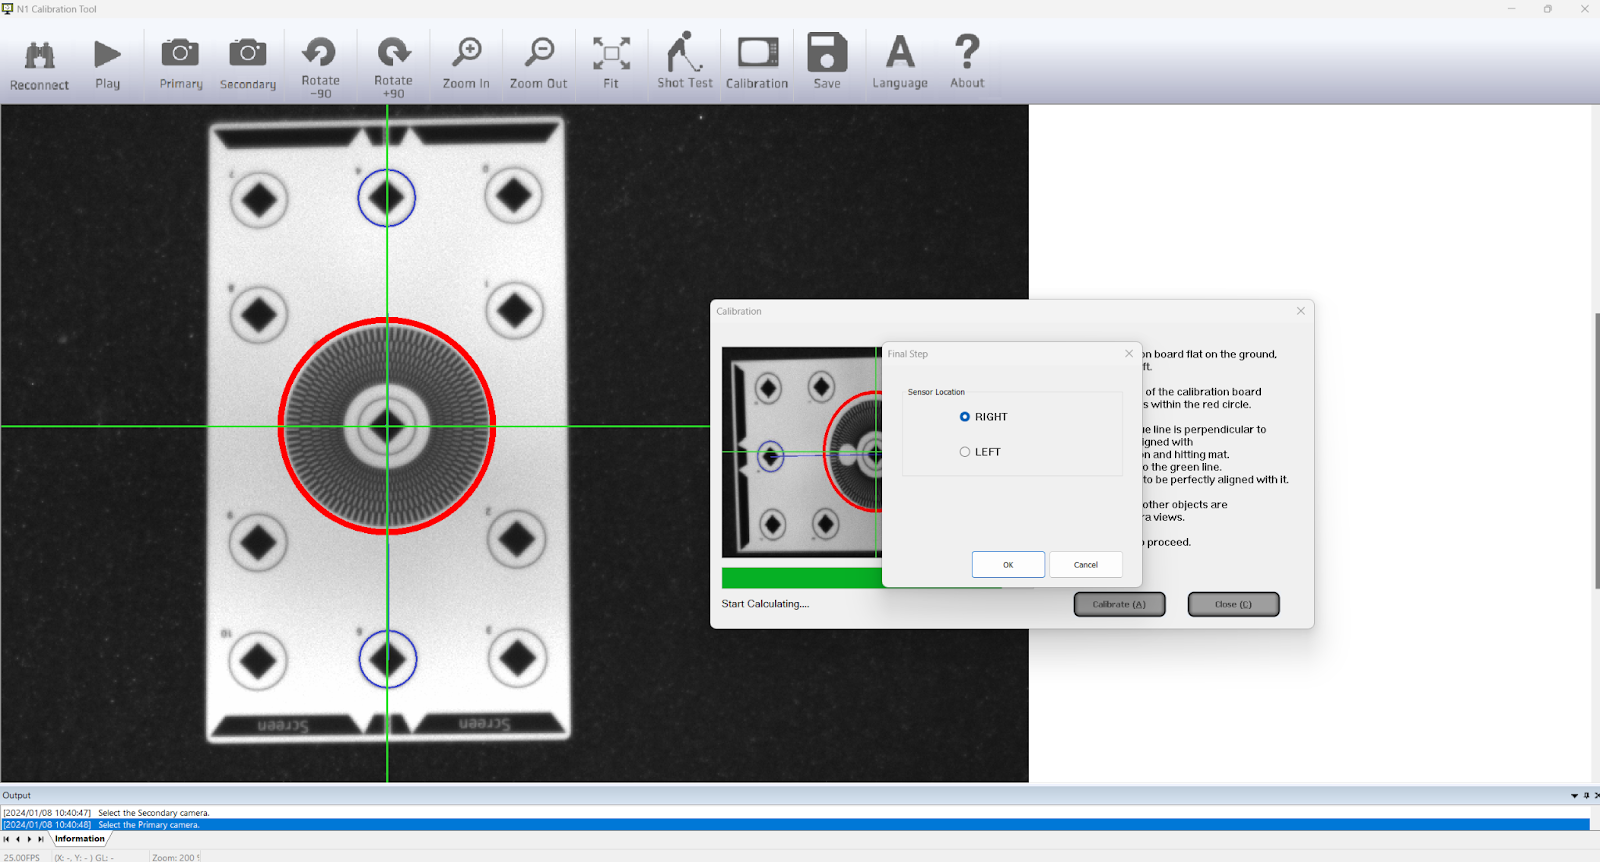
Once the calibration board, is placed, press the “Calibrate (A)” button on the calibration popup to begin auto-calibration:
If prompted, select “RIGHT” when asked for a Sensor Location:
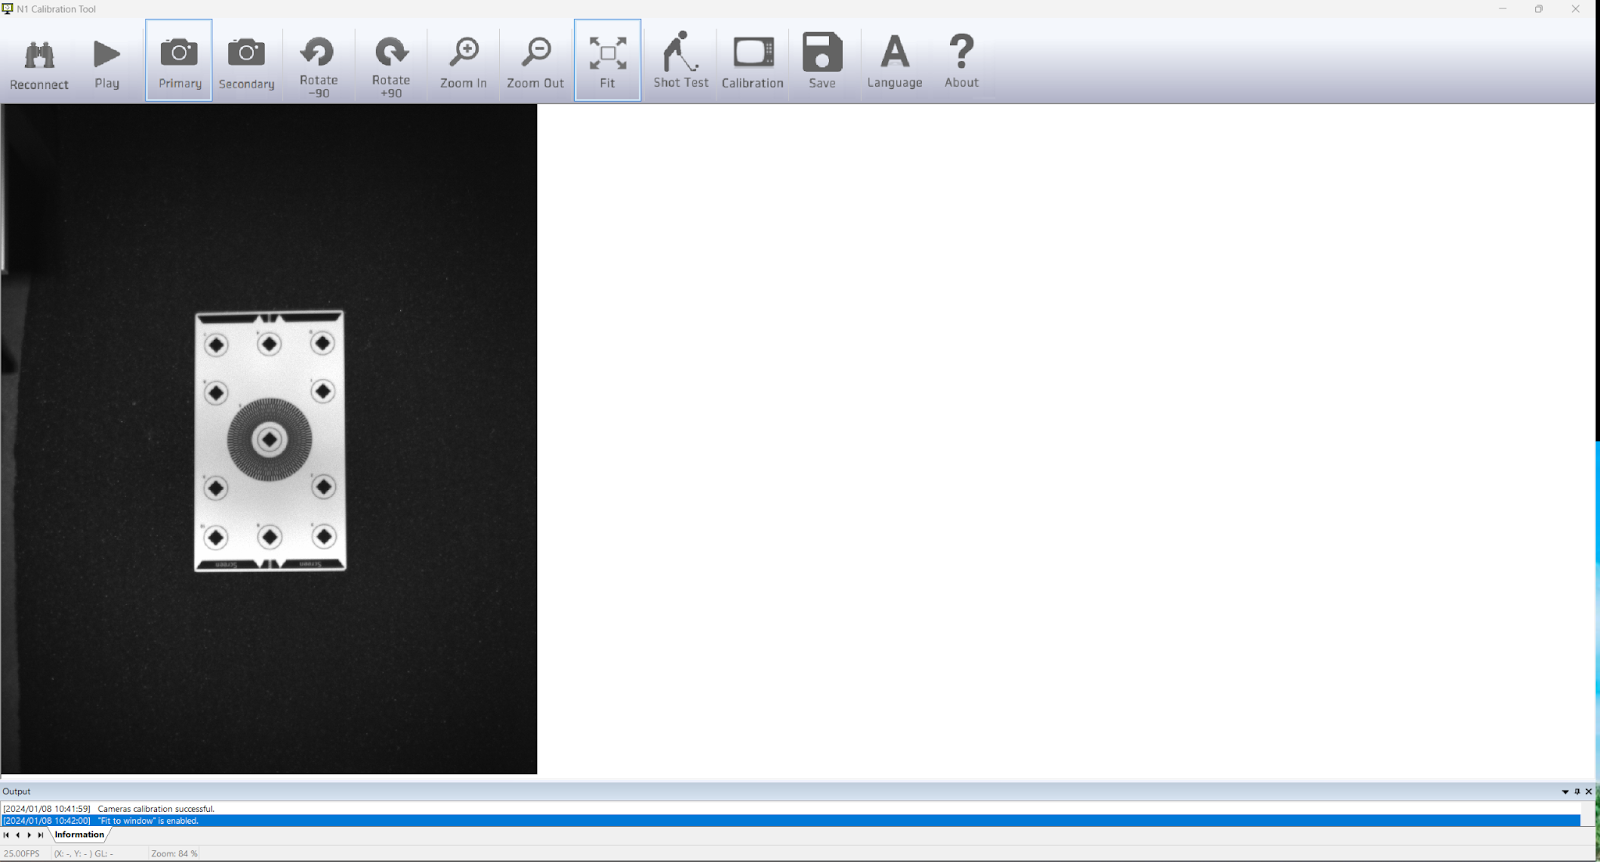
If calibration is successful, you’ll see a popup notating that the calibration was successful, and the calibration window will automatically close.
You’ll then be brought back to the home screen, with your calibration board still fully in view:
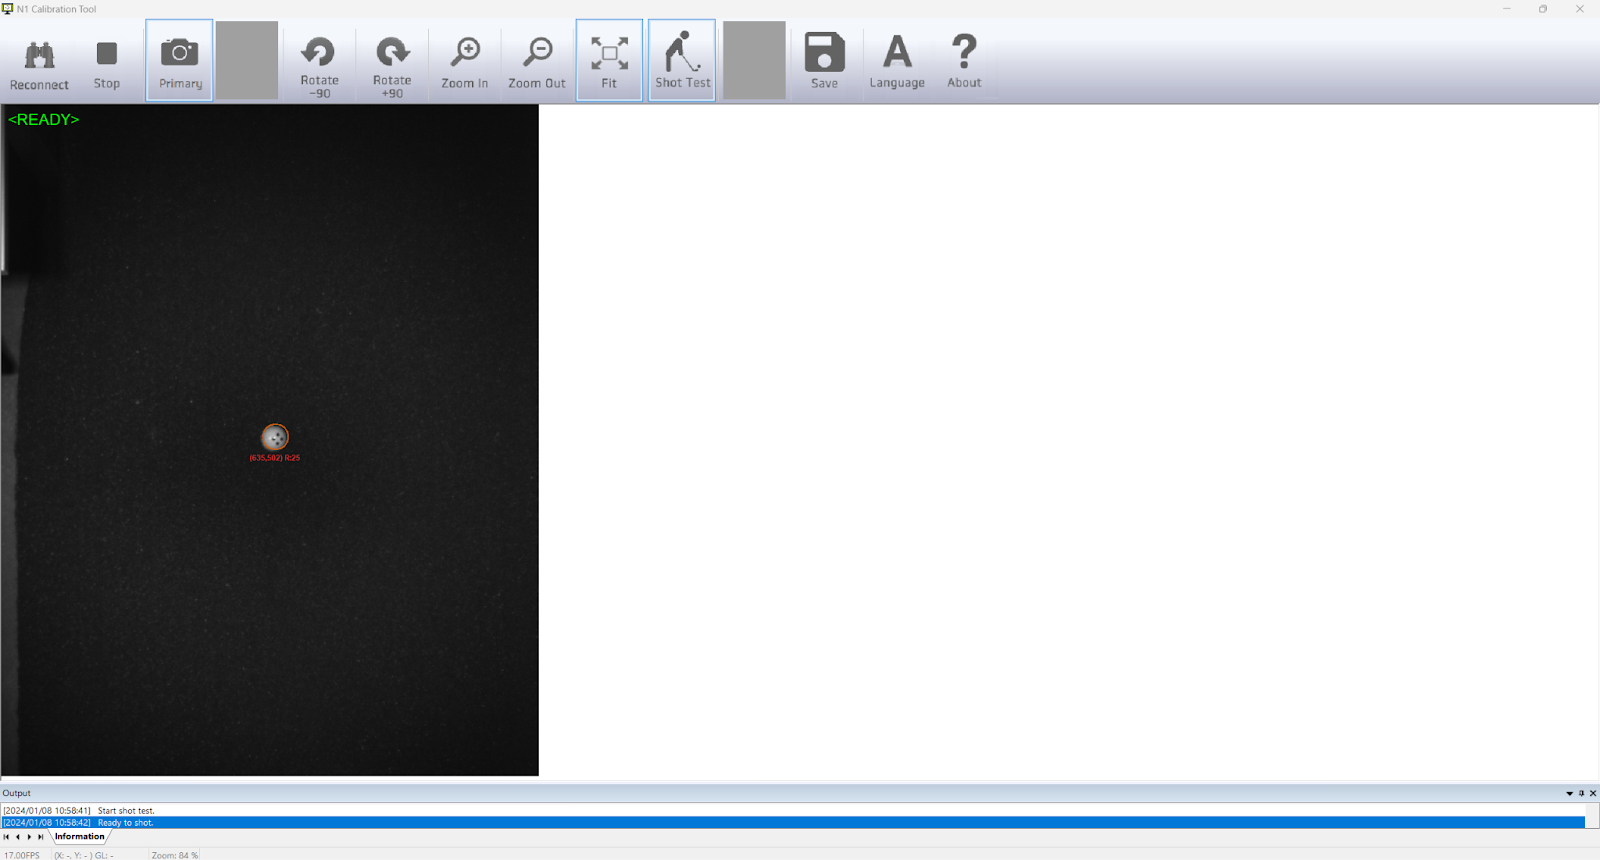
Place one of the 12 included “four dot” marked golf balls approximately where the “bullseye” of the calibration board was located, facing at least one group of dots towards the N1 unit:

Now we’re ready to test our shot! Click “Shot Test” on the top toolbar and you’ll immediately be asked “Are you testing with a putter?”
If you are about to putt with a putter, click Yes. If you are about to swing with a club aside from a putter, click No.
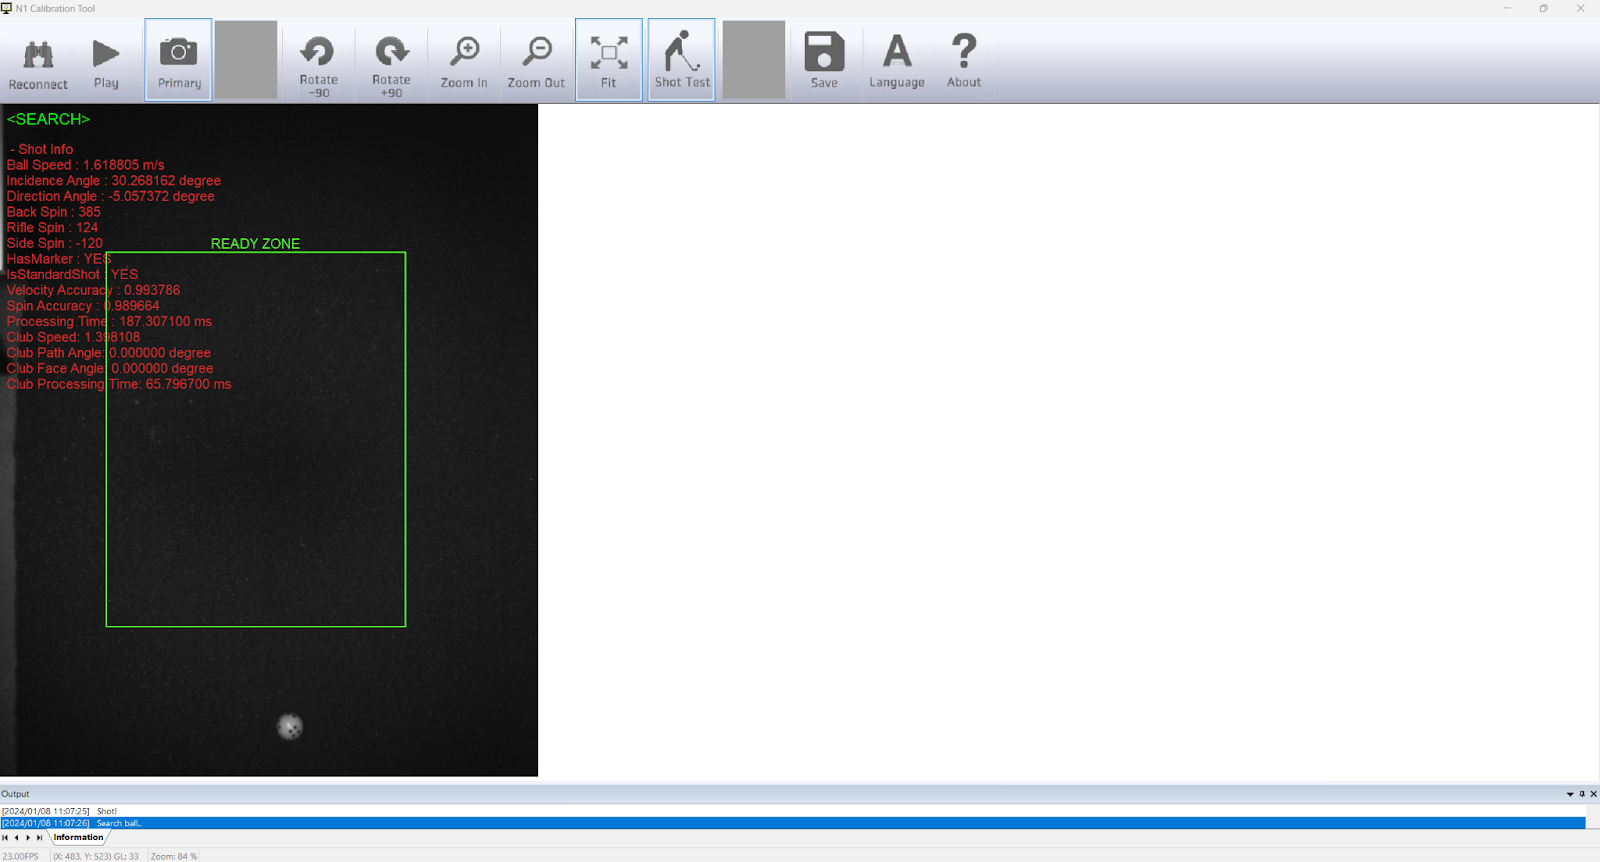
Once you’ve selected your option, the N1 unit will look for the ball in the hitting area. When the N1 unit finds a ball, you’ll see a green READY indicator at the top left and there will be a circle around your ball, like this:
Once a shot is read, the shot data will appear on-screen, like so:
Your N1 unit is now ready to read another shot. Simply set an NVISAGE marked ball within the ready zone to set up another shot.
N1 Calibration App Toolbar Functions
In addition to these core functionality components, there are other features present in the N1 Calibration app that can be activated using the buttons on the top toolbar:
- Reconnect: press this button to reconnect your N1 unit to the N1 Calibration app. This can be essential if your computer has gone to sleep or your N1 unit has powered down.
- Play: press this button to activate the N1 unit and immediately display a current video feed on-screen.
- Primary: press this button to display the primary camera feed
- Secondary: press this button to display the secondary camera feed
- Rotate Counterclockwise: press this button to rotate the displayed camera feed 90 degrees counterclockwise
- Rotate Clockwise: press this button to rotate the displayed camera feed 90 degrees clockwise
- Zoom In: press this button to zoom the displayed camera feed in
- Zoom Out: press this button to zoom the displayed camera feed out
- Fit: press this button to fit the camera feed display to your current window
- Save: press this button to save your settings
- Language: press this button to toggle your language options between English and Korean
User Guide
User Guide
Out of the box, your NVISAGE N1 is able to connect to GSPro and E6 Connect. You’ll need to use our connection app in order to facilitate this connection.
USING YOUR NVISAGE N1 WITH 3RD PARTY SOFTWARE
On your desktop, double click the N-Connect shortcut to open up the N-Connect app. Conversely, you can find it by navigating to C:\Program Files\NVisage\Pio\Tools\N-CONNECT.exe
Once you open N-Connect, you’ll see the following display on the popup applet:
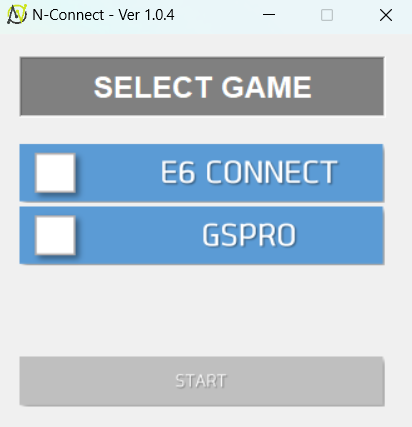
Select your sim software of choice, then press START:
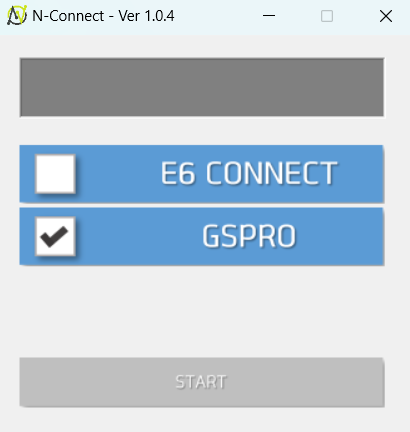
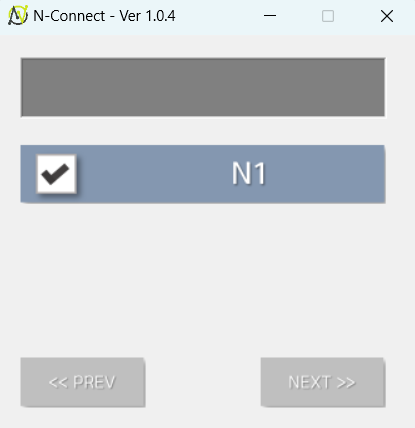
On the next page, select your N1 device:
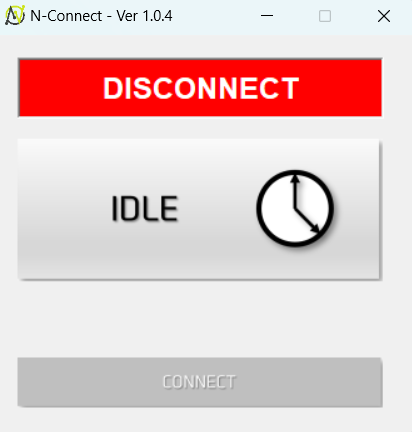
On the next screen, you’ll see your connection with “DISCONNECT” in red at the top of the window:
Press the CONNECT button to fully initialize your connection:
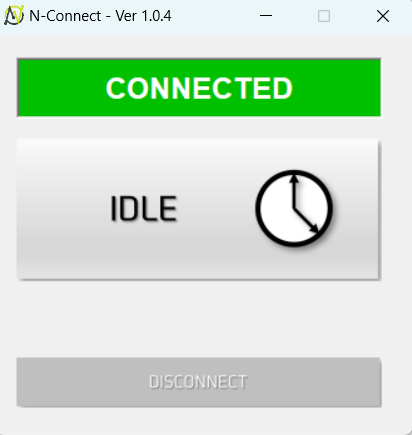
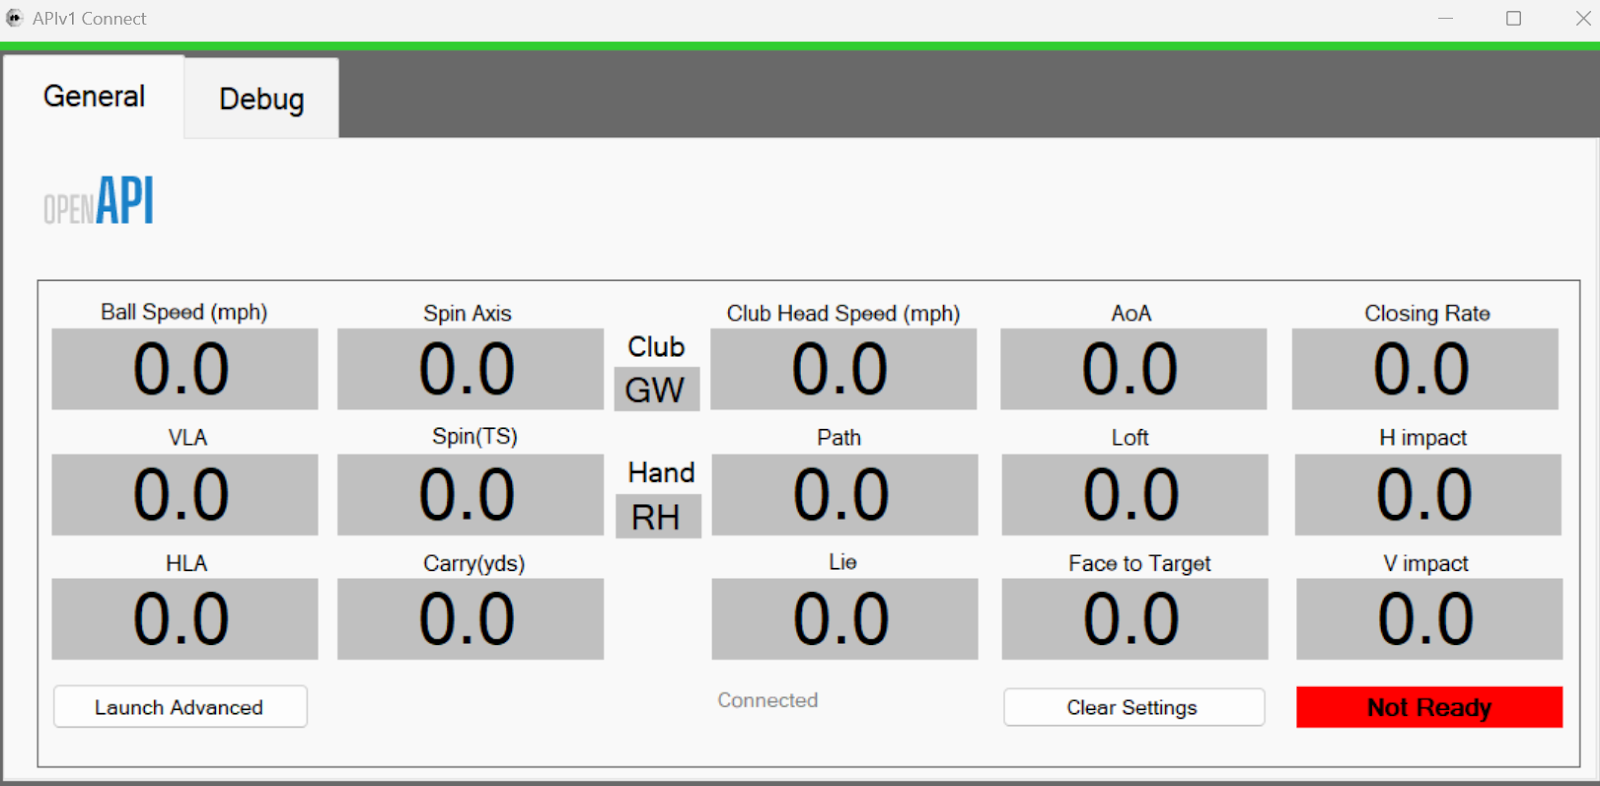
You should now see that you have an active connection in your golf sim software of choice:
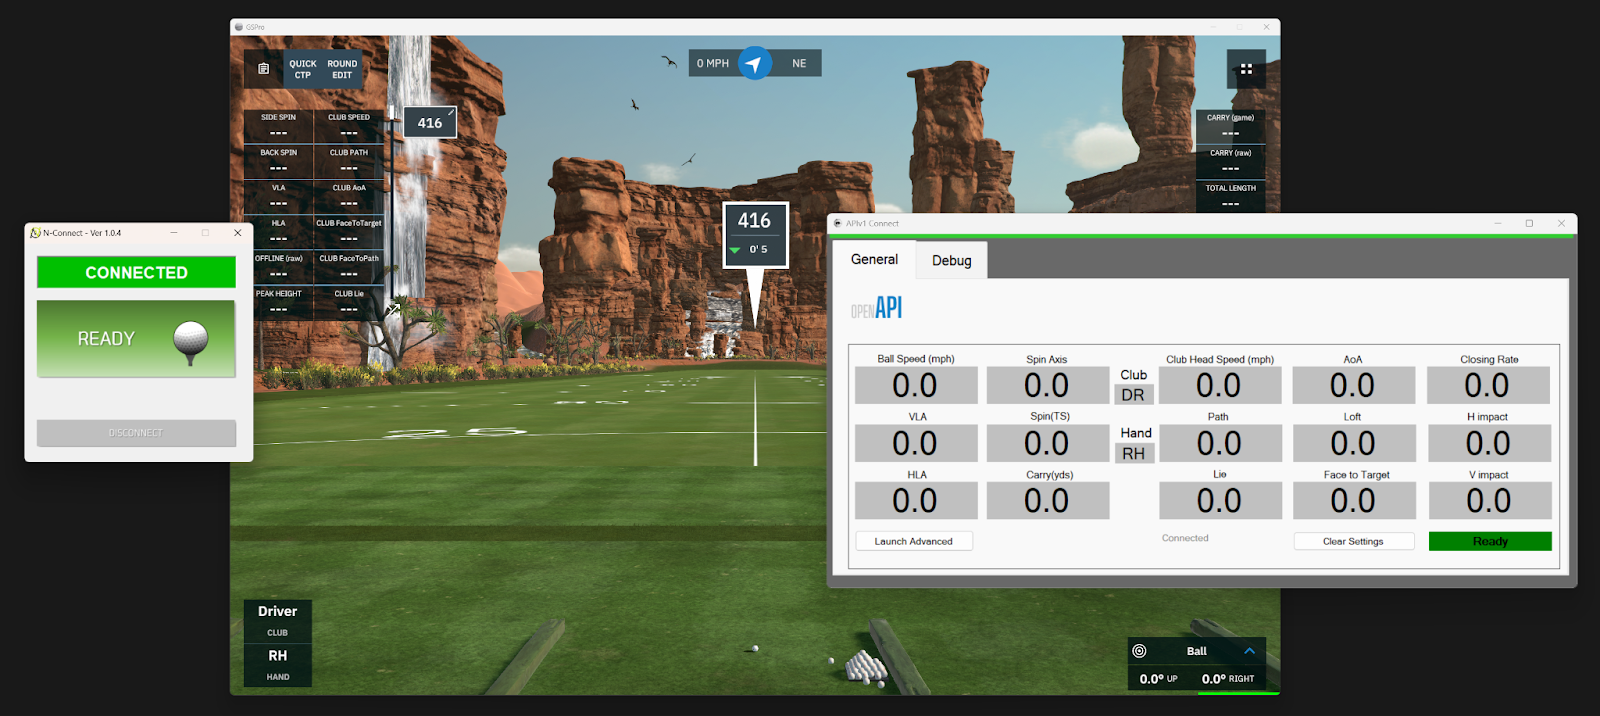
All that’s left now is to open up a course of your choice and take your swings whenever N-Connect indicates that it’s found the ball and is ready to receive your shot:
FAQ
FAQs
Why am I losing the connection between the N1 and my computer when my computer goes to sleep?
The most common issue you’re likely to experience is the connection between the N1 unit and your computer going to sleep after long periods of inactivity. Pressing the “Reconnect” and “Play” buttons within the N1 Calibration app are a good first step to re-initializing that connection. In some cases, you may need to close the N1 Calibration app and restart it, after verifying that your N1 unit is powered on and connected.
Why am I having trouble connecting to my golf simulator software?
You may intermittently notice issues when connecting to GSPro or E6. More often than not, this is due to the order of the steps that need to be completed. Review the steps in the above section Using your NVISAGE N1 With GSPro and E6 Connect, making sure they’re completed in that order, and try again.
If you notice that you’re still unable to connect to your sim software of choice after following the steps included in this guide, you may need to adjust your firewall settings. Open Windows Firewall (or Windows Defender Firewall), click “Allow an app or feature through Windows Defender Firewall”, verify that the following apps have the domain, private, and public boxes checked:
- G4Calibration
- N-CONNECT
- GSPRO
How can I get more help with my install?
If, for any reason, you need a little extra help, we’re here and happy to assist. Fill out a support request and one of our knowledgeable, friendly support technicians will help you out.